Wooden building blocks are a classic toy for open-ended play. So I try not to be too hard on myself for picking up yet another set for my kid whenever I see a good deal at a second-hand toy store or dollar store. When I have a pretty good assortment, I can turn them into something else… like maybe MONSTER BLOCKS?

This post contains Amazon Affiliate links for your convenience.
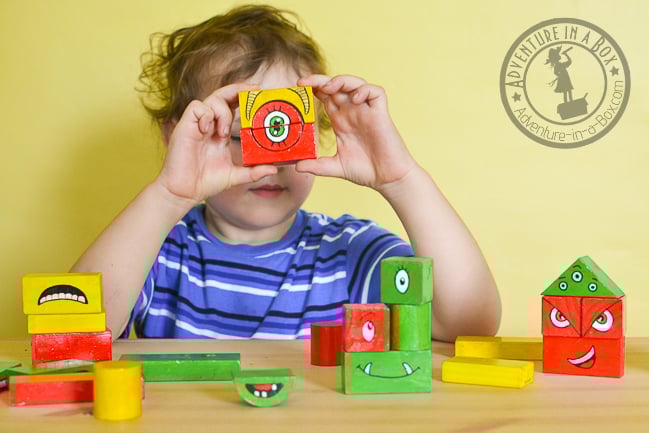
Silly faces seem to be irresistible to toddlers. After spending the first year of their lives staring unabashedly at every face they can clap eyes on, they know what is normal and seem to delight in everything that isn’t. Budster loves to giggle as Daddy contorts while shaving and Mommy froths while brushing her teeth, so he came of age for a face-building puzzle.
It is fun for him to play with monster blocks, but it was a even more fun for us to make them!
Materials
– A set of plain wooden building blocks. These can be purchased economically from discount or second-hand stores. Recently I have seen a set for $3.50 at Dollarama.
– Non-toxic paints (we used yellow, red and green acrylic paints).
– A black marker (I have been very fond of Sakura ink pens lately, but a good old Sharpie marker
should do the job).
– A varnish that will work with the paint you use (we used Triple Gloss Glaze by Decoart)
Painting Monster Blocks

1. Unpack your blocks. Children’s blocks don’t usually require any preparatory sanding before painting, which is one of the reasons they are so well suited to this sort of project.
2. Divide your blocks into groups, and paint each group a different bright colour. We used acrylics for painting, but tempera or gouache would work as well, or you can also try staining them with liquid watercolours.
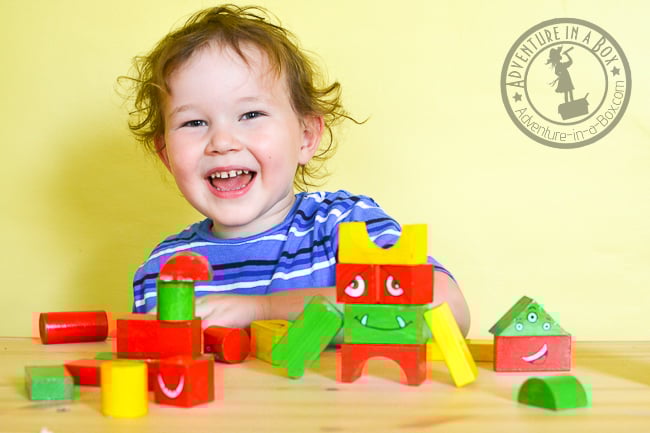
3. The fun part! Paint facial features on the blocks and outline them with a fine black marker. Little blocks like cubes and cylinders are good for painting eyes, and long cuboids are great for mouths and moustaches. Add horns, beards and hats! Different sides of one block can have different designs painted onto them. If you have a child who is old enough to help, all the better: turning wooden blocks into monsters can become a family craft! I think we will have to make additions to our collection with Budster’s help in a couple of years.
4. Once all the layers of paint have thoroughly dried, seal the blocks with a layer of the appropriate varnish. Let the varnish dry, and they are ready to be played with.

Upon discovering the blocks, Budster first giggled himself silly when we built funny faces for him, then went to work on his own creations. There was one thing he had to set straight from the beginning, though – monsters that were caught frowning would be taken apart and rebuilt with a smile!

In no time, all of his other building toys were adorned with smiling monster faces, too. He stacked them on top of the Lego cars and brought some of his Magnatiles over. The blocks have also featured in sorting games – by colour, by shape and by body part.

Two years later…
The blocks are still with us. Budster, now almost four, doesn’t play with them all the time, but every time he finds them in his drawers, among the other puzzles, he’s delighted to see them again. He likes building silly monster faces.
Last time we took them out, we made a new fun game. Now Budster builds the monster, and then we both try to mimic its face. What a workout for my facial muscles!
If you want to stay updated on new stories from Adventure in a Box, consider subscribing to our Facebook, Pinterest, Twitter or Instagram pages.


Trackbacks/Pingbacks