I love kid’s drawings, and I have always found it fascinating to see how crafters and small companies make kid’s drawings into personalized keychains or kid-designed stuffed toys. This year, for Mother’s and Father’s day gifts, we did it too! Our first experiment included a bit of polymer clay, a toaster oven, and a lot of loving drawings of our family made by my three-year-old son.
There are so many fleeting moments in childhood, so I relish the notion of capturing my son’s first squiggles or shaky first letters, then turning them into something a little more lasting and substantial than a piece of paper.
This post contains Amazon affiliate links for your convenience.
Up until recently, my son hadn’t produced much more than very confident abstract compositions. Then one evening Jeffrey showed him how to draw a spaceship – a TIE-fighter, to be precise. That evening, all eighty pages of the sketchbook (and one wall upstairs) were covered with TIE-fighters, and suddenly, just like that, drawing became one of Budster’s favourite things to do. Now his sketchbooks are populated with his favourite characters, animals and machines.
With all these reams of kiddie artwork populating my craft table, I decided to start our own line of kid-designed things. I doubt that they will make it anywhere further than grandma’s house, but I know that they will become greatly appreciated keepsakes there. With Mother’s and Father’s Days approaching, they have potential for fun gift ideas for grandparents!
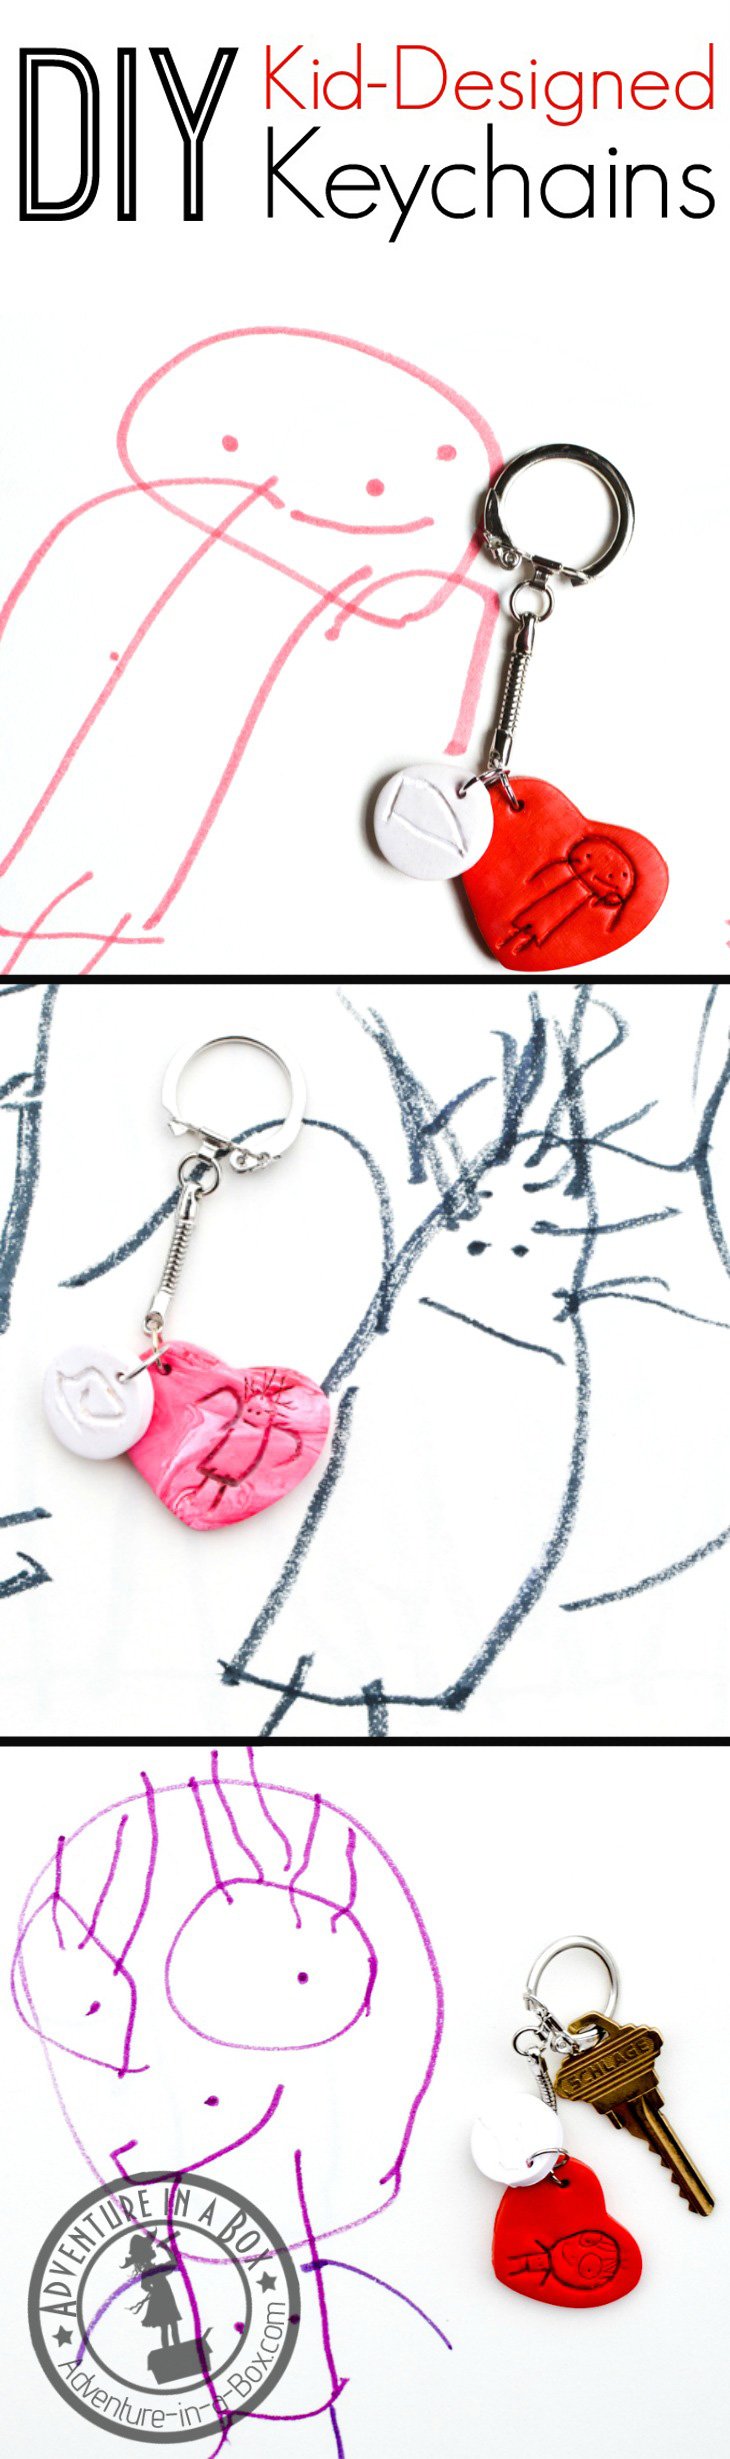
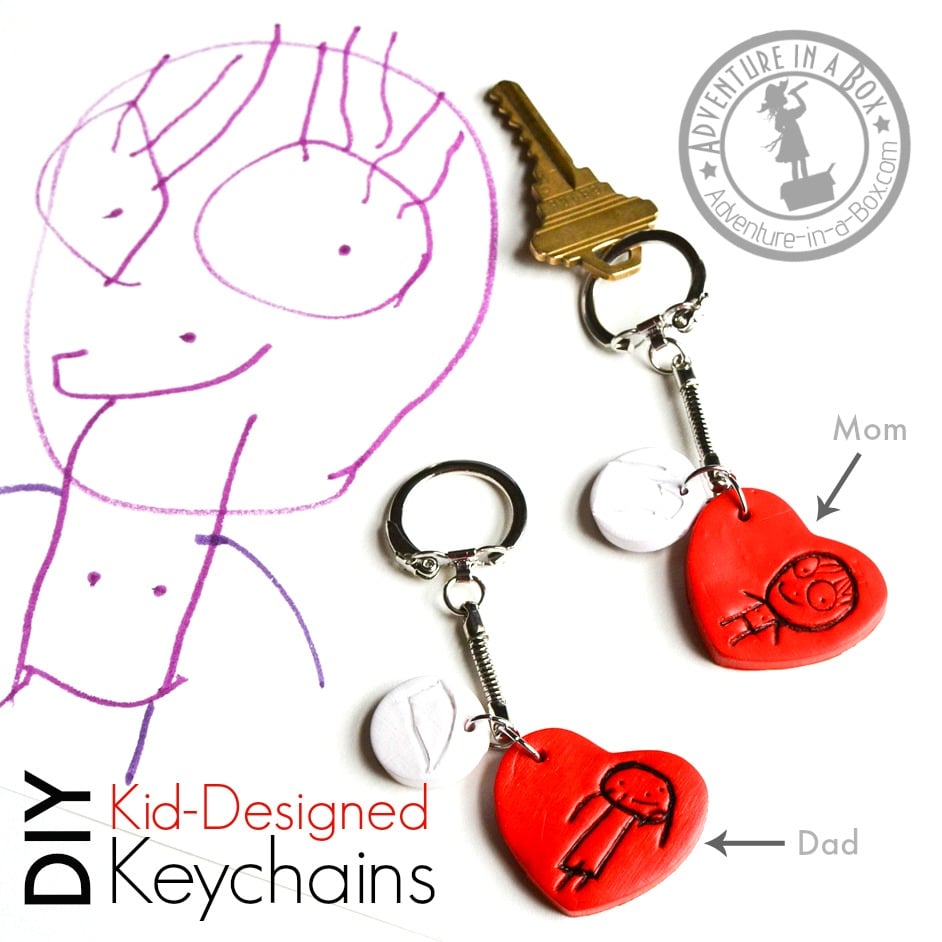
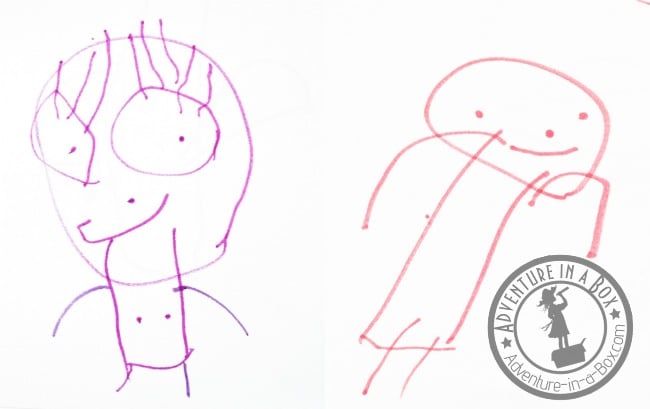
With the confidence of a young artist, Budster doesn’t shy away from making portraits of everyone he knows, and I have no trouble finding material when looking through his sketchbooks. Mommy and Daddy are his favourite models. It’s pretty easy to pick out “Mommy”: Budster usually draws me with big circles for the glasses that I wear at home, and indications of his favourite anatomical features of the maternal torso. Daddy, on the other hand, shaved his beard a while back and therefore lost his main defining feature, so I have to trust the artist’s opinion as to which portrait is Dad’s.
Neither of our grandmas live very close. My mom has to fly across the world, so her portraits are usually dominated by airplanes. We have recently moved closer to where my husband’s mom lives, and Budster had spent a delightful weekend with her just before I asked him to make a picture of Grandma. I explained that we’d turn it into a gift for her, and gifts are something he’s very fond of!
Not only did he make a picture, but also asked me to write that it was grandma. After I had done just so, he carefully copied the word in his own handwriting. Cheers to those who can find all the letters! Our grandma styles herself “grama”, so there are only five letters to look for.

With the artwork completed, the rest was easy!
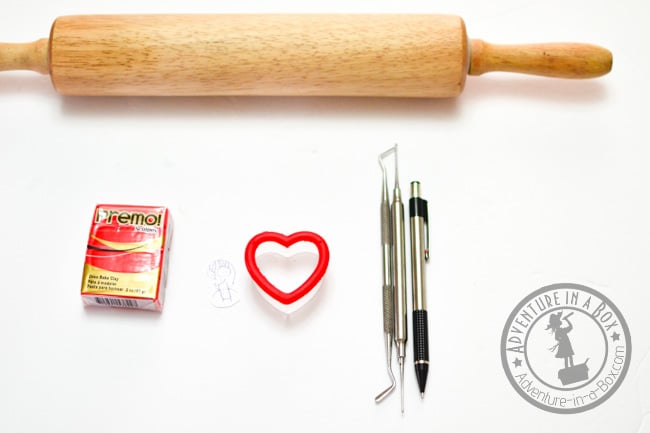
Materials
- A little block of polymer clay or two (2 oz.): If you’re unfamiliar with polymer clay, it’s a non-toxic material that comes in many colours and is easy to sculpt with just enough hardness to make highly detailed projects. After you give it the form you want, it can be baked at 275 F in a toaster oven (or conventional oven) to harden. Then it can be washed, sanded, carved and, most importantly, dropped without breaking. My favourites are Fimo Classic/Professional and Premo. The difference in their properties is negligible for small projects, but Fimo is made in Germany and easier to find in Europe, while Premo comes from the USA and is more popular in North America.
- Tools that can be used for sculpting: If you were just looking for an opportunity to get a set of sculpting tools, a little set like this can come handy for a lot of projects! But chances are you already have everything you need for this project around the house. I used to sculpt with my manicure set. You may have some useful tools in your kid’s play-dough box or your toolbox! Darning needles work well for me as well. Just try different things and see what you feel most comfortable with.
- A rolling pin: As stated on the packages of polymer clay, it’s non-toxic and can be washed off, but to be on the safe side, I do keep two separate rolling pins – one for baking and one for various craft projects.
- Little cookie cutters.
- Keychain bases with jump rings.
How to Make Kid-Designed Keychains: Step-by-Step
- Scale your drawings to fit in your cookie cutters. Our cookie cutter heart was about 1-1/8″ tall, so I needed to make the height of the drawing about 1″ tall. I photographed the drawings top down in good light, scaled them on the computer, then printed them. I used Adobe Photoshop for scaling. Crop the drawing to its edges, then select Image -> Image Size and set the dimensions according to your numbers in inches or centimetres.
 Word programs (Microsoft Word, OpenOffice Writer, etc) can be used for scaling as well. Make sure that the rulers are on, and scale the drawings down, while holding the SHIFT button. On the picture below you can see on the ruler on the left that the height of the drawing is 1″ now.
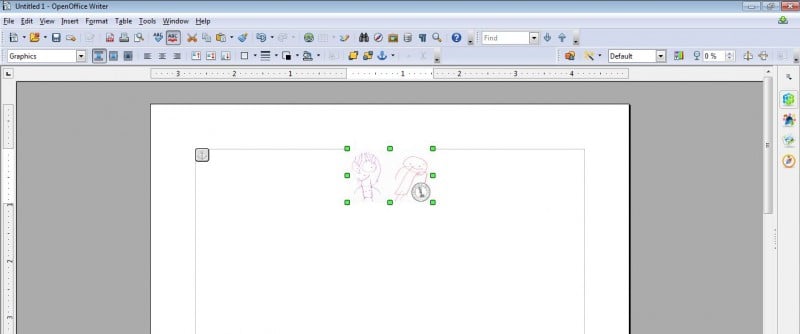
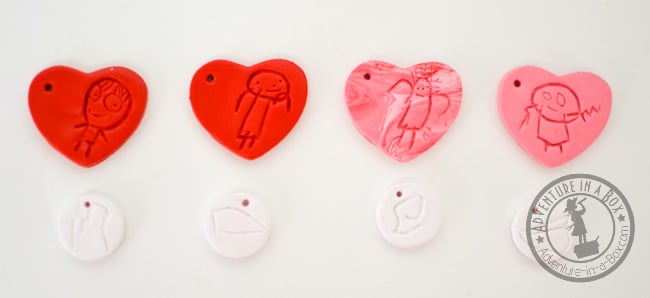
- Now, it’s time to start working with polymer clay. If it’s your first time, you may need a couple of tips on how best to handle it, but it isn’t a complicated material at all. Think of it as play-dough for adults! Wash your hands before working with it and have a clean surface prepared for it. It picks up dust very easily, which is especially noticeable on light colours. Knead it before starting to sculpt, to improve its plasticity – it can be a bit crumbly right out of the package. Kneading usually leaves your hands a bit stained, so washing between colours is advisable .To make a new colour or create a marbled effect, you can mix two colour of polymer clay. That’s what I did, making two red hearts, one marbled pink and one solid pink. I used white and red polymer clay for that.
- Knead your polymer clay and roll it out, as if you were making cookies.
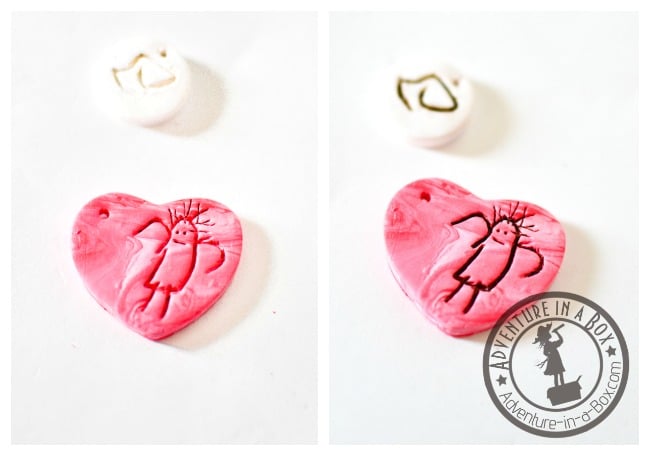
- Now you can transfer your images onto it. It’s very easy: just put your drawing on top of it and trace over the lines with a sharp mechanical pencil. When you lift the piece of paper in the end, there will be faint lines, imprinted into the clay. Alternatively, while tracing, you can do it in dot-to-dot manner, like on the picture below – that will make for an even brighter imprint.

- Deepen the lines with the help of a sculpting tool and a needle. I used the dental pick-like tool for the body outlines and the needle for the finer face features and hair. (Note the polymer clay handle on the needle tool – did I mention that it is handy stuff?)

- Cut the shape out with your cookie cutter. We made four hearts with drawings and four circles with letters (M is for Mommy, D is for Daddy, G is for Grandma, and B is for Baba). Make a hole in the corner with a needle or a pencil for attaching it to a key-chain.
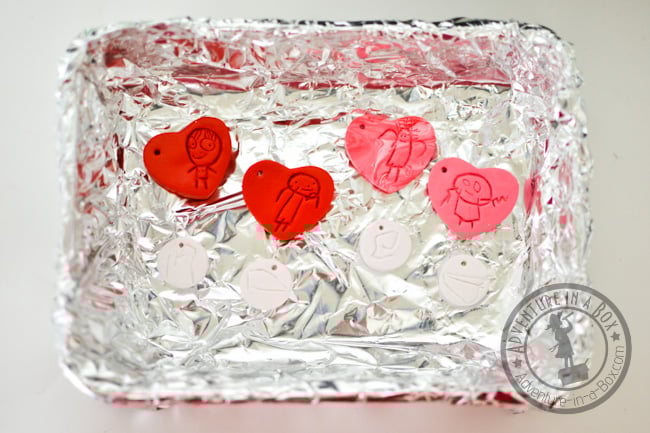
- Bake the pendants in the oven. I usually line a little cookie sheet with tin foil and bake my projects on that. For temperature and duration of baking, read the instructions on the package of your polymer clay. We put our 1/8″ thick pendants in for half an hour at 275 degrees F. When the time is up, take them out, but let them cool down completely before handling them further. It’s worth mentioning that baked polymer clay is both carvable and sandable, so you can still correct some small imperfections at this point.
- To darken the outlines of the drawings, you can go over the lines with acrylic paint , then quickly wipe the paint off the surface with a damp cloth. Here is our experiment with it. If you don’t like how it looks, you can remove the paint from inside the lines with a dishwashing brush.
- Finally, use jump rings or split rings to attach the pendants to the keychains. A pair of pliers help.

And to get a feel of how the keychains were made in real time, you can watch this video!
The whole batch of key-chains didn’t take more than two hours, and older kids can do it from start to finish with a little help from parents.
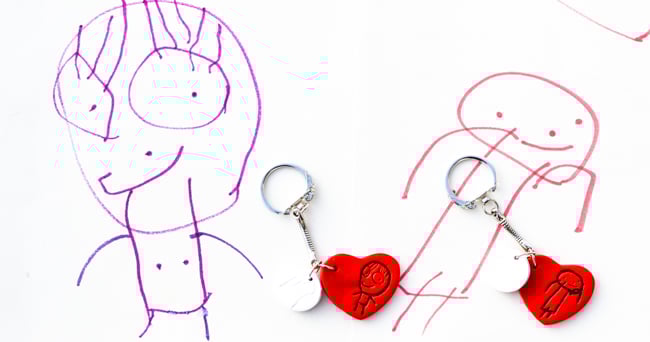

Our key-chains are finished and ready to be given away! Well, except for Mommy’s key-chain that I have already slipped my keys on. Every time I rummage through my purse and see it there, I cannot help but grin.

If you want to stay updated on new stories from Adventure in a Box, consider subscribing to our Facebook, Pinterest, Twitter or Instagram pages.