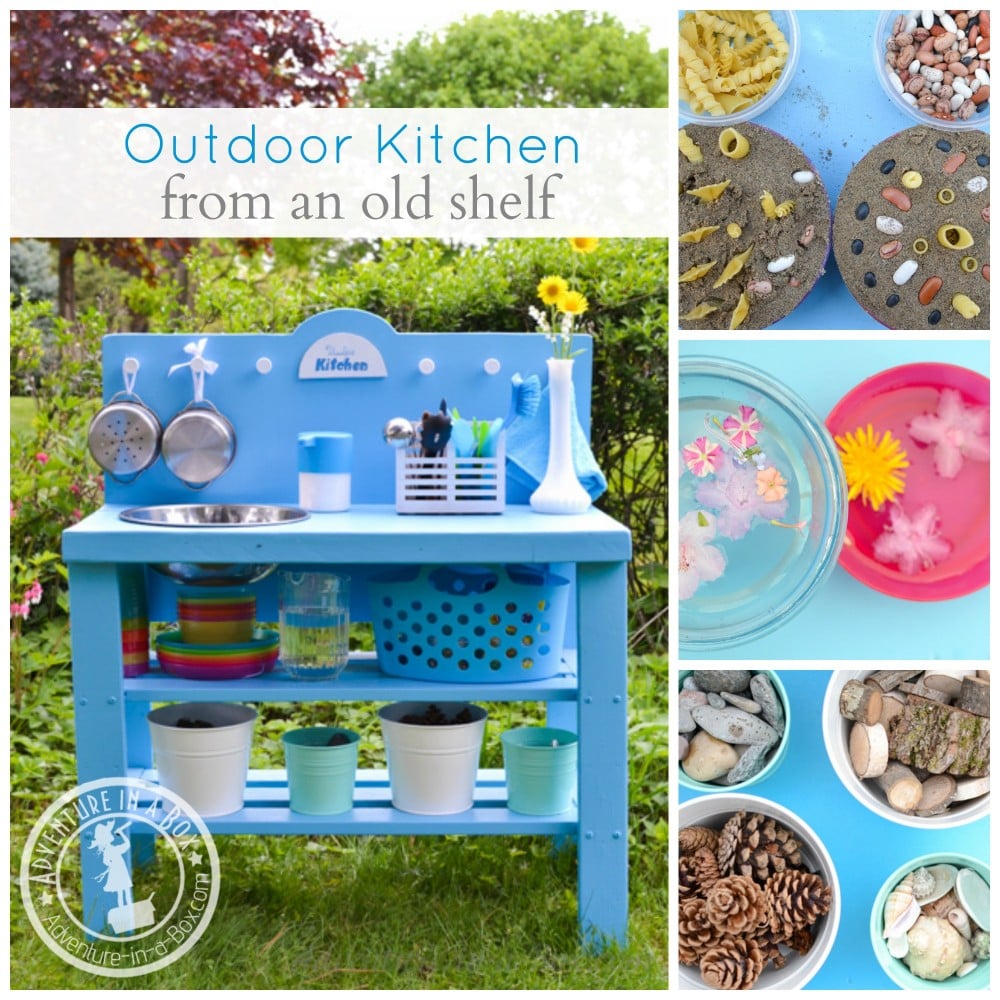
After a long and snowy winter, our backyard looked desolate, but we didn’t feel discouraged. Instead, we embraced the chance to give it a makeover. In no time, dreaming and planning was in full swing. “Here we’ll put a sandbox, and there’ll be a waterwall! We’ll throw this old table away, and we’ll add some flowers here.” Cleaning spreaded as far as the shed where I found an old shelf. My first reaction was that it had to go. Then I gave it a second critical look and thought that it was a perfect height to turn it into a simple outdoor play kitchen.

Making a play kitchen has been on my list of projects to do for many months. I imagined a sturdy and elegant wooden kitchen with a variety of fancy knobs to turn and drawers to open. With the very real possibility of moving in a few months, I put this idea on hold. We didn’t want another bulky piece to move. As a matter of fact, for a few months we have been in the midst of decluttering, hence my initial desire to get rid of the old shelf.
But we didn’t want to put all the fun on hold. So when I saw this old shelf, I thought that it should work well as a simple play kitchen. One I could put together in a few hours. One I wouldn’t feel bad about leaving outside for the summer where all the mudpie cooking is going to happen. And if there is no space in the moving truck for it, we can also leave this kitchen behind. So, unlike the fancy play kitchen of my dreams, it was supposed to be a very cheap and simple play kitchen for the backyard. In other words, little work and tons of fun!
If you don’t have an old shelf, you can see from the initial photos that it’s a really basic construction that can be put together from some boards.
1. Our shelf came from Ikea, but it doesn’t look like they sell this particular model anymore. It had a bunch of holes for regulating the height of the shelves, and we started out by filling them and other imperfections with wood filler. Budster helped too: he likes to smooth wood filler with a spatula.
2. After wood filler set, I sanded the shelf smooth. More or less smooth, anyway: it was a pretty rough surface to start with.
3. Next, I measured the dimensions of the top of the shelf and marked the rectangle that would later become a countertop on a piece of 1/2″ plywood. I added a couple of inches on the sides and on the front, but not on the back. For the back I marked another rectangle. I was using some leftover plywood and only had enough to cover the back down to the first shelf.
4. We cut the marked pieces with a jigsaw, then cut a circle out in the countertop piece. It was for a stainless bowl to represent a sink. A couple of days previously, we had gone on a big thrift shop hunt. We were looking for a few things – a stainless steel bowl among them. I’m happy to say that I found the perfect one in the second thrift store we visited, and it cost me $2. New stainless steel bowls like this go for about $10, so yay for thrift stores!
5. I was thinking that adding a piece of plywood on top and one at the back of the shelf would do the trick, but Jeffrey advized that I add some supports for structural stability. To support the ends of the countertop, scrap 2×2″s were cut and screwed in between the end uprights.
6. The rest of the support was applied directly to the counter top – in the back it was made to fit between the uprights, and in the front it was made to extend in front of the uprights, to create an overhang. A 2×2″ was attached down the centre just to the side of the sink hole, to make the counter more rigid. You can see on the picture that we used all sorts of leftover wood in our project. It would have been easier to use one 2×2″, but it was fun to have this project come together out of junk. :-)
7. The countertop got screwed to the uprights, and all of the joints and screw holes were filled and sanded.
8. The backdrop was set in place and screwed to the uprights and the horizontal 2″ x 2″ at the back of the countertop.
9. I gave the whole construction a couple of coats of semi-gloss outdoor paint and set the bowl in.
The rest was small decorative work. We screwed in six knobs into the back of the kitchen, so that later we could hang pots and pans from them. We got a good deal on six little white knobs at Ikea!
I took time to make a sign for Budster’s kitchen. I actually considered writing Budster’s Kitchen on the little board I cut out with a scroll saw – my son is quite fond of his pet name. But then I opted for Mudpie Kitchen. I painted the board white, wrote on it with acrylics and then sealed the sign with outdoor varnish. It was glued to the back with epoxy glue.
And the kitchen was ready!
Looking for bowls and pots to fill the shelves of the kitchen was my favourite part. For a couple of weeks, every time I went to a thrift store, I would first go to the kitchen section. Ikea was a big help as well. Here is the list of what we ended up getting!
– A set of plastic cups, bowls and plates similar to this one. We actually had a set from before. Budster hardly ever eats from them, but he loves taking them into a bathtub or filling them with buttons, so they’re always full of fun things and in the middle of the action.
 – Four plant pots made of galvanized steel. Galvanized steel won’t rust outside, and when we eventually decide to disassemble the kitchen, I can always use them for plants, so I was very happy with them. I filled the pots with rocks, pinecones and seashells. We collected shells and rocks earlier this year at the lake, and there was an abundance of pinecones in the backyard. I took some of Budster’s nature blocks that I made last year and put them in the last pot. I thought they will work well as wooden cookies and, of course, for making little scenes outside.
– A soap dispenser that looked like a tap faucet. I’ve found one in the clearance section at Ikea for $0.99, and filled it with water. Budster loves playing with soap dispensers, so I knew it was going to be a hit.
– A wooden cutlery holder from a thrift store. I covered it with white outdoor spray paint to match the blue-and-white colour scheme of the play kitchen. Inside went a brush, an Ikea kitchen utensil set and a few plastic spoons, forks and knives.
– A spray bottle. It was actually the fourth spray bottle I bought this season. It’s one of Budster’s favourite toys, but we’ve yet to find a sturdy one.
– A little plastic pitcher.
– A plastic bin from a Dollar store that looked like a grocery tote. I put a couple of plastic containers filled with beans, pasta and buttons inside. What decorates mudpies better than a couple of buttons! I wrapped little boxes of cereal with packaging tape and threw them in as well.
I was putting finishing touches on the kitchen while Jeffrey took the happy boy out on a hike in the woods. Of course, Budster had seen me redecorating the shelf, but he didn’t see the bowls, the pots or their contents. I wanted it to be a surprise. So when Budster left with Daddy, there was just a painted shelf in the garden. When he came back, it was his outdoor play kitchen, and it was ready for some cooking.
Budster’s reaction? “Wow! Look at that!” Then there were a happy ten minutes of exploring all the shelves and naming everything that Budster found on them.
I wasn’t surprised to find out that the soap dispenser posing as a tap got his attention first.
Normally, I don’t want to end up with a sink full of soap and promptly tell him, “That’s enough soap, now let’s wash your hands.” Little wonder that when no one stopped him, he pressed it about a hundred times in the first hour.
Next, he got the pitcher and poured water into the pot. From the pot he transered it into the bowl. From the bowl back in the pot. Does my cooking look like this to Budster? Who knows.
Finally, he poured the water into the sink. Next, he dumped there all of the rocks and seashells and announced that he was making a soup. He threw a couple of blossoms in to spice it up as well. Must be a very special Mediterranean soup.
Budster didn’t hesitate to use his hands in mixing the ingredients, but got very excited when I offered him the utensils. He had to try each one of them. Suddenly making the soup game turned into fishing.
That entertained Budster for a long time. He fished with a ladle, then switched to tongs. It was a rather new implement for him, so he took some time, mastering the use of tongs. To be honest, I use them so rarely that I have to learn to manipulate tongs all over again when I come across them.
Of course, all the possibilities couldn’t have been explored in one day. Over the next few days, we came back again, and Budster made some mudpies, to prove the worth of our Mudpie Kitchen’s name. We moved the sandbox so that it would be conveniently located close to the kitchen.
Flower soup is another dish that is regularly prepared in our kitchen. We keep hoping that some ethereal creatures will bid us a visit to try it, but this far we only spotted robins who lost interest very quickly when they realized that pink doesn’t mean strawberries.
When mudpies and flower soups are combined, we open a restaurant and serve them at a little outdoor table to interested customers!
And when everything else fails, Budster throws all of the ingredients together and makes his special – mud soup with rocks and seashells!
That’s the story of the old shelf. As all of my favourite stories, it includes a transformation, and it has a happy ending. And to think that I was about to throw that shelf away!
What’s cooking in your backyard this summer? I’d be delighted to hear about everyone’s projects.
If you want to stay updated on new stories from Adventure in a Box, consider subscribing to our Facebook, Pinterest, Twitter or Instagram pages.


Such a cute outdoor kitchen! I’m interested to know if you bring the sink, dishes, buckets of stuff, etc. inside every day or if you leave them outside all the time?
Thank you, Katie!
I just leave everything outside because the things I chose are either pretty sturdy (like the sink – nothing will happen with it) or not very valuable (like rocks and branches).