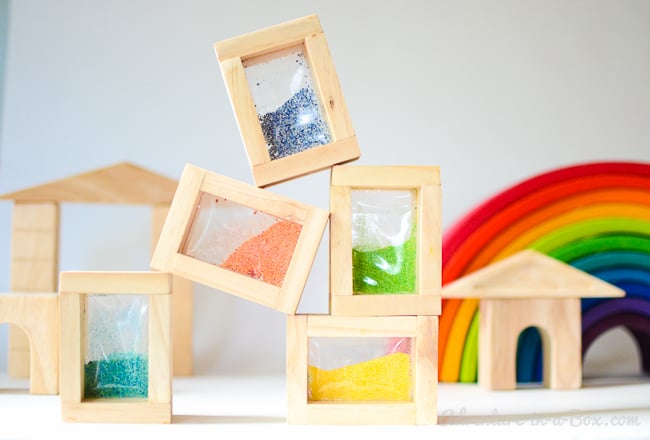
Adding unique wooden blocks to our collection is always fun. Who knows what will become of them! They may act as stained-glass windows in a three-story palace, or as sun-catchers on our windowsill. I wanted to get some new specialty blocks for my son, and a couple of weeks ago an idea of how to make rainbow sand blocks popped in my head.
This post contains Amazon Affiliate links for your convenience.
Our collection of wooden blocks has grown steadily since Budster got a starter set for his first birthday. For the Christmas that followed, I built him a set of coloured window blocks, following this simple and beautiful tutorial from And Next Comes L. A year later, following the same inspiration, I made a version of wooden mirror blocks. The sand blocks I saw for sale seemed interesting, too, so this time I decided to experiment with building them.
Supplies to Make Rainbow Sand Blocks
– Tumbling tower, also know as Jenga. The discovery that it is perfect for making homemade versions of see-through blocks was made by Dyan from And Next Comes L in her tutorial of how to build colour blocks. It is by far the cheapest and easiest solution. I buy a set for $2.50 at the local Dollar store, and I can make five blocks with it.
Alternatively, I could buy a few long skinny pine boards (1/4″ x 1/2″ x 8′) at a lumber yard or home improvement store. However, by my conservative calculation, I would have to spend $16 on boards, and then cut forty pieces to size. When cutting the block from boards, however, the size of the blocks can be varied.
– 2″ x 3″ clear resealable bags, 4 or 6 mil thickness (they are much stronger than sandwich bags, and one has to really try to puncture them)
– fine cornmeal or cream of wheat
– I used wood glue, and it worked well; polyurethane glue will be even better because it will fill the cracks as it dries; hot glue is a possibility.
– food colouring
– file or coarse sand paper
Tutorial on How to Make Rainbow Sand Blocks
 1. For making one rainbow sand block, you will need eight wooden blocks out of the tumbling tower box and one plastic bag.
2. Glue three wooden blocks into an open-ended rectangle, as shown on the picture 2. You will need two of those for each rainbow block.
3. While the glue is drying, dye cornmeal. On the picture, you can see that I dyed quite a bit of cornmeal, but I needed it for another project. For the rainbow sand, you will hardly need a teaspoon of each colour. Put some cornmeal in a plastic bag, add a little drop of food colouring and, through the plastic, rub the grains of cornmeal between your fingers to distribute the colour. Cornmeal is naturally yellow. I also made red, green, blue and purple- coloured cornmeal.
4. Glue two open-ended rectangles together with a plastic bag sandwiched between them. The zip-lock needs to be set just above the open end of the rectangle. Let the glue dry.
Fill the bags 1/2 to 3/4 full with cornmeal. You can seal them and see if you like how the sand moves inside, and depending on your preference, put more sand or take some out.
5. Now, you need to glue on the remaining two blocks to close the rectangle. The resealable zip-lock is thicker than the rest of the bag, so a small area on one of the remaining blocks will need to be filed or sanded away to accommodate it, as can be seen in the profile of the block in picture 5.
6. Sand the blocks for a smooth uniform finish, and they are ready to play with.

Playing with Sand Blocks
Budster started by building abstract structures on the table. Occasionally, he would pop up from behind his creation or look through one of the windows and exclaim, “Coo-coo!”
Eventually, the construction site moved onto the windowsill. It is fun to see light coming through the windows.
Rainbow sand blocks can become:
– windows, aquariums and other see-through objects in wooden block constructions
– rattles that make a soothing “ssssh” sound
– pretend glasses to look through
– sun catchers
I can imagine that there are other ways that children will play with them, and those are only the uses my son has discovered this far. From my adult’s point of view, it is peaceful and mesmerizing to watch sand flow from one side of the window to another. They also fit well in my ideal of a playroom with many open-ended toys advocated by Reggio Emilia and Waldorf educational approaches, so I am very happy we have a set.
If you want to stay updated on new stories from Adventure in a Box, consider subscribing to our Facebook, Pinterest, Twitter or Instagram pages.


So do you just fold the top of the bag over and glue it?? I tried to blow up that $5 picture but am having trouble seeing what you did to secure it closed.