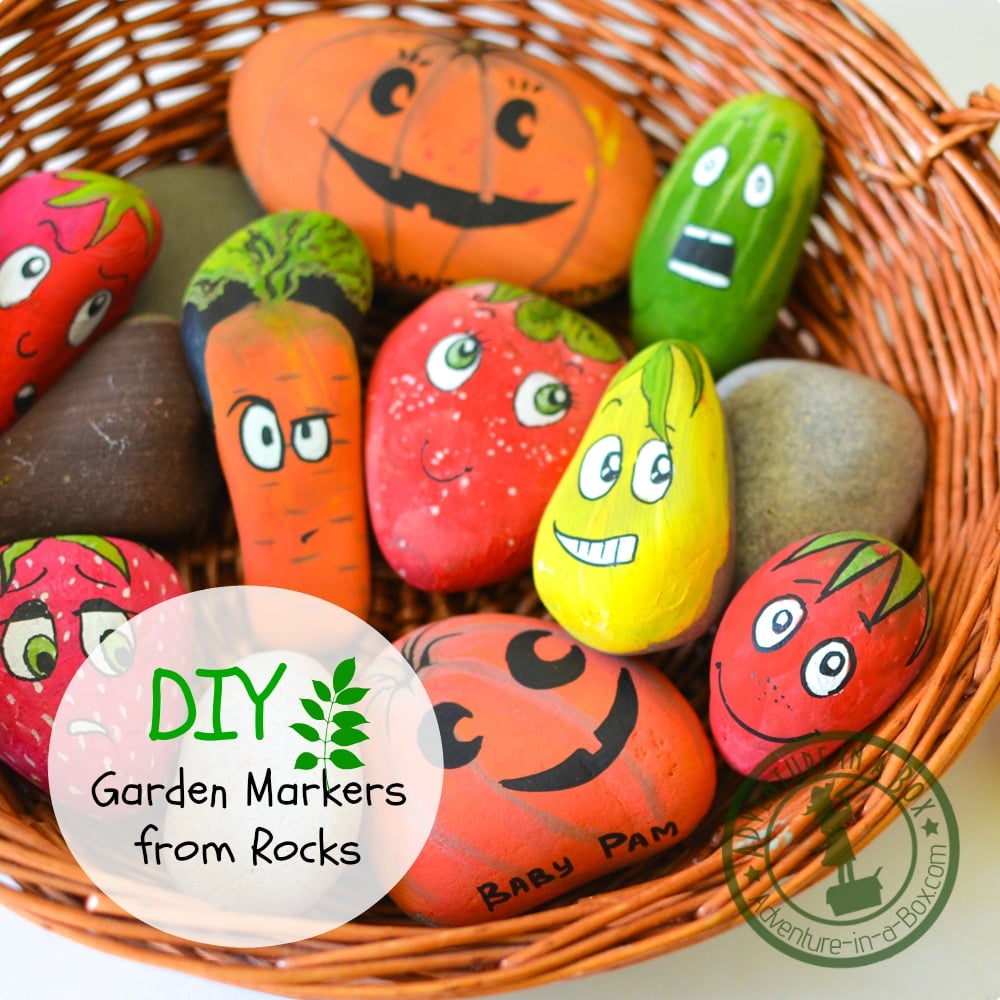
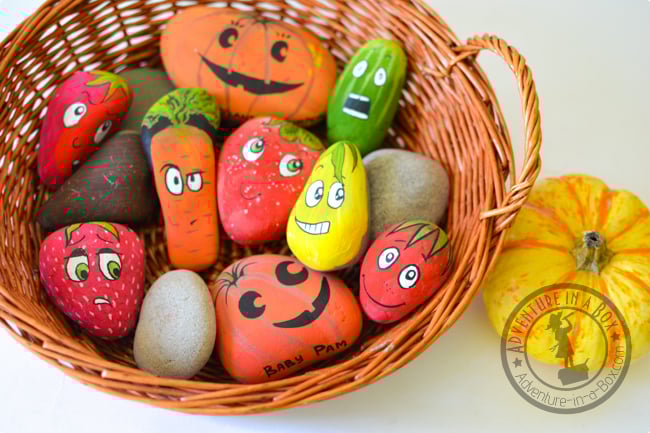
Looking for a simple, cheap and cute solution for making vegetable markers? Try garden marker rocks!
The post contains Amazon affiliate links for your convenience.
Last week, as we were planting our garden, we once again faced the question of how to label our rows. I wanted to create garden markers that were simple, inexpensive, and cute. It would be a bonus if I could get my toddler involved, as they love being part of the action.
Then it hit me: I remembered painting rocks a few years back, and the idea began to take shape. If I painted rocks to resemble different vegetables, they could serve as perfect garden markers, and my toddler could even help with the base coat.
First, I thought about what plants we’d be growing. Our garden space is limited, but we still relish the taste of homegrown veggies each year. We’ve found that tomatoes and carrots are notably better than their supermarket counterparts.
This year, we’re growing five varieties of tomatoes, with my current favourite being the yellow “golden cherry” tomatoes. We also like to try something new each year. This time, we’ve chosen sunberries and ground cherries. We discovered ground cherries at a farmer’s market in Montréal last year and were captivated by their fresh flavour. While we couldn’t find seeds for poutine or macaroons, the ground cherries will be our little nod to Montréal this year.
Luckily, finding rocks wasn’t an issue. We gathered them from our favourite beach on Lake Erie. If you have a spot nearby where you can collect rocks, this craft can turn into a fun family outing! If not, you can always find small bags of decorative rocks at local stores.
Materials for Making Garden Marker Rocks
- big and medium-sized rocks, smooth ones work best
- gouache or acrylic paints (I used gouache in the photos here, but in the video below, you can see how it looks with acrylics)
- outdoor varnish
How to Make Garden Marker Rocks
1. Cover the rocks with paint
I entrusted my son with the task of painting the rocks with solid colours. For our joint project, we used gouache: it is non-toxic, washes off pretty well, yet has good covering properties.
For older kids, who can be careful with paints, I would recommend acrylics. When they’re dry, they form a non-water-soluble layer. If you want to have the markers just for a few weeks or plan to keep them indoors for early planters, you can use acrylics and forego the last step of covering the rocks with varnish. Gouache projects need to be varnished. That’s the main difference.
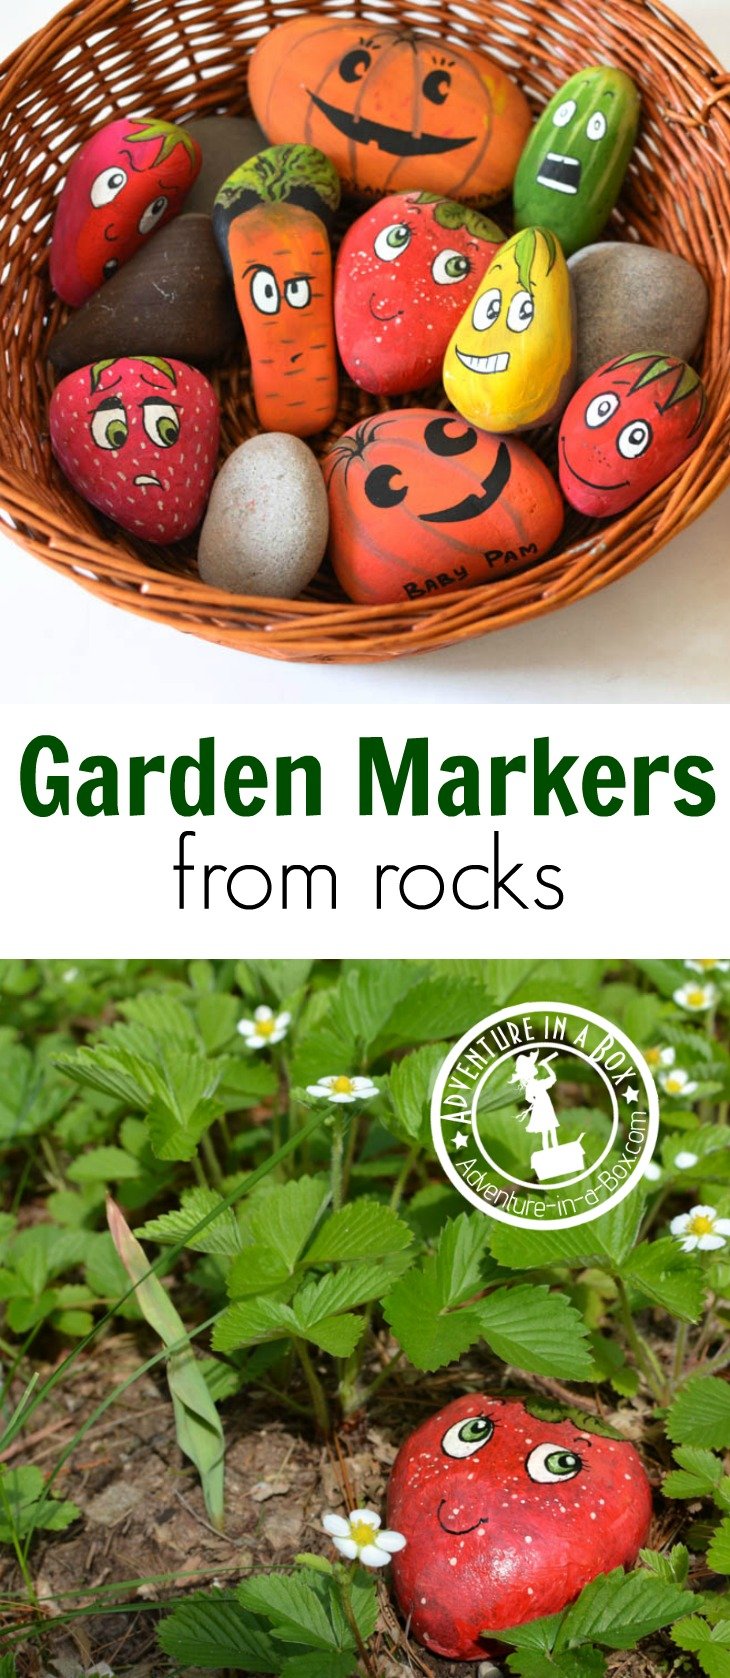
Orange for pumpkins, pink for strawberries, green for cucumbers, red and yellow for tomatoes. It is always fun to try painting something new and see how the improvised canvas responds to the paint. Rocks have a very pleasant texture: smooth and grainy at the same time, and my son liked holding them as well.

We did painting in a couple of sittings because my son’s hands would get coloured quicker than the rocks he held. He used it to his advantage. He would only have to grab a new rock to make it half-painted! Of course, at times, his artistic vision extended beyond the stone, and the table would get coloured as well. While for some colours, one coat was enough, yellow had to have a couple of coats. Based on the colours and the paints you use, you may need to give a second coat to your rocks after the first layer of paint is dry.
After the rocks dried, my son played with them. Painted rocks actually made a nice addition to the building corner with our nature blocks. A few hours of play was enough for his possessiveness to wane, after which I collected the rocks to continue working on the garden markers.
2. Add details

I added some lines and leaves to make the painted stones look a bit more like the plants they symbolize.
3. Draw faces
We are growing two varieties of pumpkins this year: one is good for carving into jack-o-lanterns, and the other is supposed to be excellent for pies. I couldn’t resist drawing a face on the jack-o-lantern pumpkin, and it led to the whole menagerie of vegetable characters. This part would make an interesting project to work on with older children. Who can come up with the silliest face?
You can use paint to add black outlines—or grab a marker and add details after the paint is dry!

4. Varnish
It’s optional if you used acrylic paints, but necessary for either if you want to put the markers outside and have them last longer than a few weeks. Good outdoor varnish will protect the paint against rain and UV damage. Do varnishing in a well-ventilated area and follow the manufacturer’s instructions.
I’m going to take my garden marker rocks outside tomorrow, but I am not sure how long they will stay in the garden. My son longs to get to know Mr. Carrot better and make Ms. Strawberry feel happier. They might all end up in the sandbox, having fun with him.
What are you growing this year? What kind of vegetables would you need to paint?

If you make garden markers, please, share your pictures with us by tagging our Instagram or Facebook pages. We’ll be happy to see them!
More Craft Ideas
Bird Egg Pop-Up Cards feature real-life eggs of ten different birds.
Make fairy doors from painted rocks, and turn any old tree trunk into a magical fairy house!
Make space rock magnets for your fridge!

Thank you for reading!


How amazing are your creations! Such a great way of getting children to learn about what can grow in a garden but also keep their interest by having such wonderful craft stones displaying the different types of plants. I love them.
These look so cute! I love them :) Thanks for linking up to Tuesday Tutorials I hope you’ll come back next week too!
I wiLl definitely try this with my granddaughter. We always collet rocks when we go to Lake Michigan to swim or have lunch. I know she will love this idea. Thank you so much!
These are so cute! Love them! Thank you for linking with us #Pintorials
I LOVE these – they’re too cute for words! Now shared on my Garden board! #Pintorials
Thank you!
I would like to subscribe to your emailli
WOW. I absolutely love your blog here! You’ve done a spectacular job at the painted faces. I hope to one day be as talented. Thank you for the inspiration!
Thank you for your kind words, Jeanine!
Asymmetrical 3rd of my day I will 50th my daughter and
Love the idea! I only have a balcony with avocado plants and a tiny bit of lemon balm and a citrus tree….but no garden. Eh, what – I guess we’ll make the same cute plant markers, but name them something like … plant buddies instead. :) Thanks for the idea, Liska!
And I see your kid uses an ikea apron, just like mine does. Oh they ARE useful, aren’t they :)
These are great! Love the pumpkin best – fab for Halloween too ;)
Thanks for sharing at the Mumsnet linky.
They are really great! Could you help me what type of paint marker pen did you use, please? I would like to put the stones in the garden, but simple marker could loose its color etc…
Thank you! I used Copic Markers (I have this set: https://www.amazon.com/Copic-Markers-MLB2-Multiliner-Inking/dp/B000MRSUZ8/ref=sr_1_9?s=arts-crafts&ie=UTF8&qid=1412264568&sr=1-9&keywords=copic+markers but I think they are sold separately as well). I think that in order for the colours not to fade (or at least, not to fade very quickly under the sun), several layers of outdoor varnish would help a lot!
They are adorable! Thanks for sharing the idea!
I absolutely adore this idea! This will be on our to-do list this spring! (Last year we kept forgetting what we planted where, so we had a lot of mystery squash sprouting up. This will correct that.) I know my kids will have a fantastic time helping out with these, too. And I love your other ideas on the site too! Thank you!
Thanks for sharing such a wonderful information about stone garden markers, Really, if we create markers by stone, they would be more, durable and strong for plants.
I can not get enough of this cute idea! I can’t wait to hand my kids rocks and say- make this cute! Thanks for sharing, I am going to post this on my Fridays 5 Favorites this week on my blog!
The painted rocks are wonderful but the faces really make the rocks stand out. Can you give the directions on how you draw the faces. Also the name and type of paint you used and the varnish would also be very helpful. Thanks,Connie
Such a cute and practical idea! Painting rocks as garden markers is such a fun way to get kids involved while keeping the garden organized and colorful.
visit view