For a quirky Waldorf-inspired uptake on a dollhouse, make a fairy tree doll house for kids from branches, wood and other natural materials!
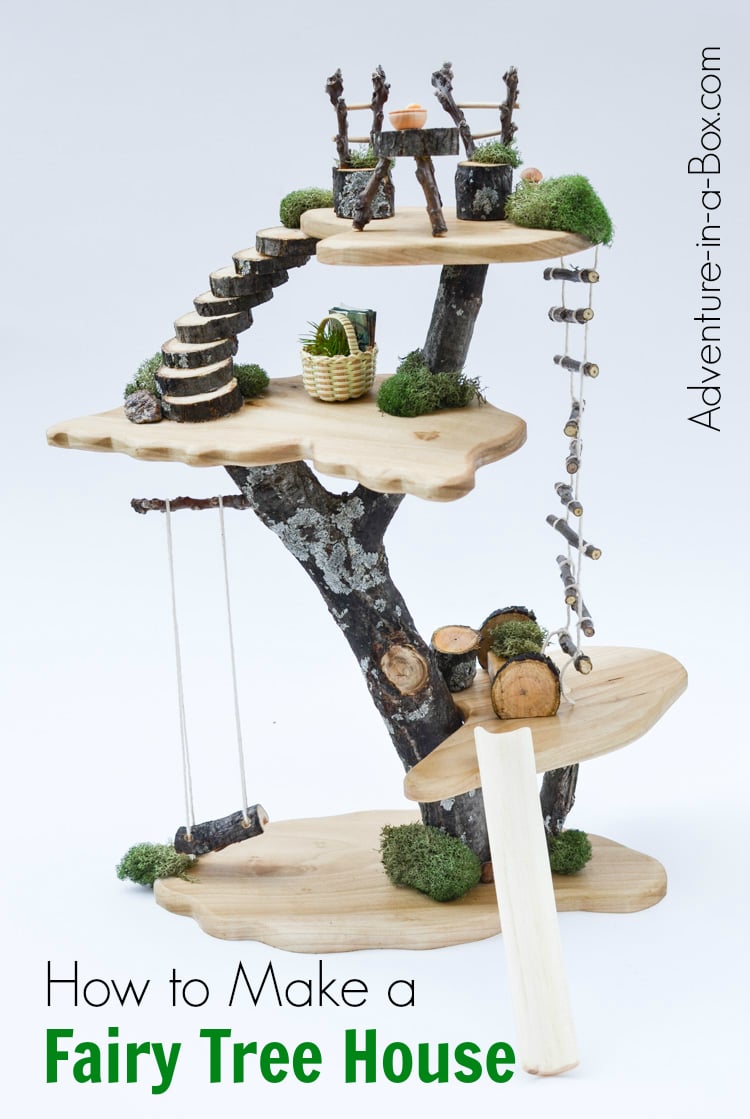
Lately, my son spent a long time, watching birds out of the window, and so he found some little bird figurines in his Easter eggs. They needed a place to live, and the very same day I started working on a house for birds. I planned to make a fairy tree house for a long time. Birds will be the first tenants of our house, but we will also invite fairies, gnomes and other forest creatures in the future.
My initial inspiration came from this toy, but later I saw others. I loved the natural look of it, and the multi-layered house seemed like a fun variation on a doll-house theme.
It is likely that you already have a few tools necessary for wood projects at home – maybe from renovation projects. Still, I would divide this project in two parts: making the actual structure of the house, as described here, requires more tools, while making the furniture of the woodland is possible with few very simple tools.
Materials
– branches from our yard of different thickness and crookedness (our neighbours cut an old walnut tree, and we had plenty to choose from)
– poplar board – width: no less than 5”; thickness: no more than ¼” (it can be any other type of wood, but, if buying from a store, poplar offers a good compromise between price and quality for this project)
– a drill with drill-bits of various sizes
– a screwdriver and woodscrews
– a handsaw
– a scroll saw or a jig saw
– a small vise for holding wood in place
– a pencil
– a sharp knife
– sand paper
– wood glue (Elmer’s wood glue works well for us)
– wood filler
Many of these can probably be turned up without too much digging, but a scrollsaw is a less common household tool – it is also the most expensive tool on the list. I love our scroll saw. Of all the tools I borrowed from my husband’s workshop, it is my favourite. It does an excellent job of cutting curvilinear shapes, and doesn’t frighten or strain me. If you are interested in doing a lot of woodworking, you can check this model. In my initial foray into woodworking I had tried a manual version of the same tool – it can be called a coping saw
or a jeweller’s saw – but it was time-consuming and required more stamina, which I just did not have at night, when all the toy magic had to work. Still, it is the cheaper option. Another option is a jig saw
, an affordable and versatile tool.
Tutorial
First, I examined the branches, chose the most inspiring ones and made a sketch that followed their natural curves and knots. Then I inserted the branches into the vise and cut them to the required height with my handsaw. At this point I could tell that the approximate height of my finished tree house will be around 15”.


Next, I took a poplar board and drew the approximate designs of the levels. For this project, you do not need to follow the lines exactly, so it would work well for trying a scroll saw or a jig saw for the first time. The levels can have any shape you want. Mine looked like this. Because I wanted one of them to have a branch poking through, I drilled a hole in it.


When the levels were first cut out, they had sharp edges, which I rounded with coarse sandpaper, then smoothed with a finer grit.

Finally, the assembly began. First, I attached the base layer. I chose a drill-bit to pre-drill for the screws and drilled a hole through the wood, then into the branch. After that, I dabbed the bottom of the branch with some wood glue and attached it with the screw to the board.

I did the same with all the layers. It was necessary to drive the screw deep into wood, so that the screw’s head was beneath the surface of the wood. After assembly, the screws could be masked with wood filler.

Next was my favourite part – adding details! By cutting several disks from a branch with the handsaw, then gluing them together, I made the stairs.


Another layer got a rope ladder. It was made of a couple of thin branches, cut into relatively equal parts to make rungs. About ten was enough for my ladder. Then, with a sharp knife, I made small notches close to both ends of the rungs. That’s where I tied the rope, which was the next step.


For the rope I used a cotton twine, but heavy threads would have worked. I cut two long strips of twine, made loops at one end of them, and then went on tying branches together.


I liked the idea of a swing, and a piece of bark worked well for a sit. I drilled a couple of holes in it and hung it on the cotton twine ropes. For the hook I used a small twig.


Rocks I collected at the beach and dried moss from the forest were glued in different places for decorations. I bet moss would be a very cozy cushion to rest on if you were tired from climbing through the layers of this house!


That was all I planned for the tree house where we could settle Budster’s birds to live.

In the meanwhile, not only birds, but other animals can visit this tree house and play on the different layers. Budster is delighted to make little scenes with them and explore different materials used in creating of this house.

See how to make a toy tree house furniture for the second part of this project! Also check out our other fairy crafts – a fairy door in the baseboard or a set of fairy mason jar lanterns,

If you want to stay updated on new stories from Adventure in a Box, consider subscribing to our Facebook, Pinterest, or Instagram pages. Thank you for reading!


I love it!
Thank you, Melissa!
This is so wonderful! What a lovely thing for your little ones to play with, so beautiful!
What a fantastic project! My little ones would love this. I’m featuring it at this week’s link party. https://www.thelifeofjenniferdawn.com/2014/05/a-little-bird-told-me-link-party-90.html
Thank you for reading and sharing! I hope we will have more fun with this house in the future. It will be fun to decorate it seasonally, for instance. :)
This has long been on my list of things to make. Such a gorgeous treehouse you have made! Really will need to make one now :)
Have you had problems with the disks cracking as the wood dries?
It would happen if the branch was not entirely dry when the disks were cut. Even with thin wood like branches, it is best to let it dry for a couple of weeks. Then the crack will likely form at the sides of the branch, but once you cut a thin outer layer, the middle part will not have cracks nor will they form later.
All that being said, I do not mind cracks when it is for a rustic-looking project like this. But I will add this information into the post. Thank you for the question, Kristi!
My dad helped me make one of these for my sister’s birthday present, and it looks great! Thanks for your wonderful ideas.
Thank you for this so beautiful and thank you for sharing this. This is a very nice business to have. I love it. Simple but amazing art. You can sell this online.
Oh my goodness! I am so in love with this and your website! I am going to ask for a scroll saw for my birthday!